hexagon logo

Saturday morning GD&T --- Surface profile of a diameter (cast cylinder)

Morning all,

Saturday morning, New customer, and PPAP being setup to run for next week, and one GD & T callout that leaves me scratching my head! Confused

The attached drawing shows the 40.8 Ø (+ draft (3° per notes is draft)) on a cast OD with a profile of 3.6 and according to the control plans Engineering sent down on the inspection plans this is being called out to check as true position of 1.8 back to -D-.Astonished

I've never seen profile of a surface called out to an OD (especially a cast OD) so what am I looking at here? Reading the GD&T book this late in the morning (I'm third shift) is not helping. Near as I can figure out with the book I'm looking at checking this cast surface with a circle in two or three spots and just figuring out what the high and low spots would be trig'ing out the possible largest diameter. Or should I check with a line on the OD and figure/report where the tangent points on the line lay within the surface profile?

Any thoughts / suggestions?? I Just need to make sure that we are reporting this for the PPAP, and subsequently an annual dimensional report for the most part given that it is a cast feature, but I want to make sure that it is correct too. I'll be back in tonight to work on this so any help from you weekend warriors would be wonderful! Thanks!
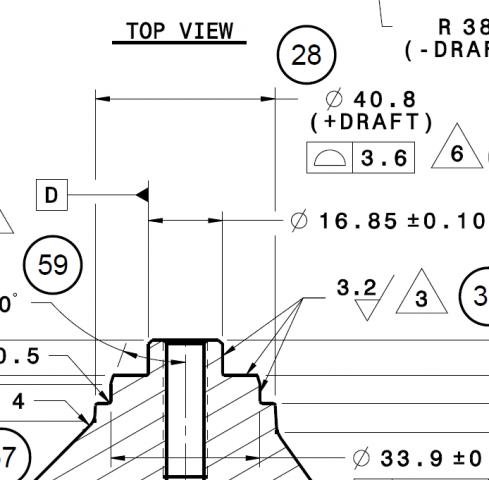


  • A simpler solution would be just to create a cone out of the lower drafted cylinder, using more points than required to get a more accurate cylindricity measurement, and then perform a coaxiality measurement back to Datum D cylinder, using standard tolerances posted on the print.


    Coaxiality would likely suffice for the engineers request of TP, but is not equivalent to profile.

    Judging by the print, I would wager that the profile requirement is for further processing, likely machining, after which a TP to D would be relevant.
  • Also when reporting make sure to change to min. and max rather then deviation.Slight smile


    Sorry report min/max for profile not position.
  • Coaxiality would likely suffice for the engineers request of TP, but is not equivalent to profile.

    Judging by the print, I would wager that the profile requirement is for further processing, likely machining, after which a TP to D would be relevant.


    Agreed.
  • All,

    Thank you for the responses and information.Slight smile

    From our engineering department (per the customer) the cast feature was listed on the print as profile due to a clearance issue (it is not machined/finished in a later operation), and they decided a better callout would be checking as a true position. In all fairness though it was one of our summer engineering interns.

    The CAD does show the 3° draft so I was able to check using both a cone and line on the surface to show that the surface is within specification.

    We were also able to show a few persons in the engineering department the effect checking as true position would have created more out of tolerance parts vs. using the profile callout. Another happy day in Quality land.