hexagon logo

Machine lost orgin of all parts after probe change

Hi guys, this is kinda a continuation of my other thread
https://www.pcdmisforum.com/forum/pc-dmis-enterprise-metrology-software/pc-dmis-for-cmms/535953-hexagon-wont-help-me-so-now-i-ask-you-for-help"

Where our tips wouldnt relate to eachother and have big deviation in XY.

I fixed this by deleting all our probe files and rebuilding them.
And when i rebuilt them i rebuilt them "correctly" because ver time we've made some changes to our probe system, but never actually updated the probe file, cos the changes were minimal. Ex:

1. Probehead from Tesastar-m to HH-AS8-T5 (Which Tech guy said is identical to the tesa)
2. Tp 1 in our rack (also master) used to be a ⌀2 ruby with 20mm/1⌀ stem + 10mm/3⌀ extension.
Now its a ⌀2ruby with 30mm/1.5⌀ stem.
3. Tip 2 changed from ⌀4 ruby with 20mm/2⌀ stem + 20mm/3⌀ extension
Now its a 4⌀ruby with a 40mm/⌀2mm extension.


So none of these changed affected our measurements/calibration.
Well anyway, so i rebuilt the probe files and calibrated the tips & got good results from calibration and also from our check program (which orgins on sphere with master and then measures the sphere with the rest of the tips and report XYZ-dev)

But when i ran our other check program (which measures a guage ring on the fixtureplate), it could find the center of the ring, but it crashed in Z as is would think the ring is much further down.
The same problem happend in all our part routines, where the machine would think the part is much lower in Z than it is.

Is this really right? shouldnt the probe find the part since we've defined our probes and calibrated them.
Or do we have to rerun the manual alignment on all our programs?

Parents
  • Yes, you need to re-run your manual alignments. Since the probe definition was wrong, any alignments previously established using the old (incorrect) probe build will have accumulated errors.


    Ok thanks, I thought calibrating the probes and establishing the new location of the sphere wouldnt affect our programs.
    When we replaced the the old tesahead it didnt affect any programs. (is that because we didnt change definition of the probe file?)

    When running a program the difference in XY is about the same, but in Z its 50mm. I didnt think it would ve made THAT much difference. (especially since the components should have the same dimensions (Besides diameter on stem/extension) )

    Is there a smarter way to bypass this? Since we're talking about a lot of programs.
    Maybe i should just restore the old incorrect probe files again?

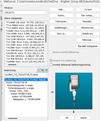
    I post a picture of the old mastertip and the new one. Maybe ive done something wrong. (The GLOBAL_TO_TESASTAR_FLANGE missning (?)

    Attached Files
Reply
  • Yes, you need to re-run your manual alignments. Since the probe definition was wrong, any alignments previously established using the old (incorrect) probe build will have accumulated errors.


    Ok thanks, I thought calibrating the probes and establishing the new location of the sphere wouldnt affect our programs.
    When we replaced the the old tesahead it didnt affect any programs. (is that because we didnt change definition of the probe file?)

    When running a program the difference in XY is about the same, but in Z its 50mm. I didnt think it would ve made THAT much difference. (especially since the components should have the same dimensions (Besides diameter on stem/extension) )

    Is there a smarter way to bypass this? Since we're talking about a lot of programs.
    Maybe i should just restore the old incorrect probe files again?

    I post a picture of the old mastertip and the new one. Maybe ive done something wrong. (The GLOBAL_TO_TESASTAR_FLANGE missning (?)

    Attached Files
Children
No Data