Can you have an out of tolerance diameter but good cylindricity results?
Your Products have been synced, click here to refresh
Your Products have been synced, click here to refresh
Can you have an out of tolerance diameter but good cylindricity results?
Example: I have a cylinder 5.0 +/-0.001" and I take 3 circle measurements across the cylinder and I get 4.9882, 4.9989, and 4.9990. Eng wants to add a cylindricity callout of 0.001". Does being out of tolerance on the diameter affect they cylindricity? He want to know if the cylinder diameter can vary 0.002" and still have good cylindricity?
The Cylindricity symbol is used to describe how close an object conforms to a true cylinder. Cylindricity is a 3-Dimensional tolerance that controls the overall form of a cylindrical feature to ensure that it is round enough and straight enough along its axis. Cylindricity is independent of any datum feature the tolerance needs to be less than the diameter dimensional tolerance of the part. Cylindricity essentially forms a perfect cylindrical boundary around the object that the entire 3-Dimensional part must lie in.
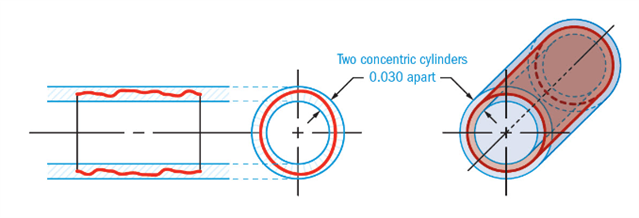
Two concentric cylinders that run the entire length of the feature – one inner and one outer, in which all the points on the entire surface of the cylindrical feature must fall into. The entire length of the called out feature would be controlled.

That is where I get confused. It says all the points need to fall into the tolerance zone. What if I have a huge taper in my part? The tolerance for cylindricity must be smaller that the tolerance for the diameter.
You're correct in that aspect. What I meant is that the size is not a consideration in the calculation of the cylindricity. The feature is best fit. The callout being less than the diametric tolerance is because if it's larger, it controls nothing. But you can put it on a drawing. It just won't control anything.
Zen Cat Thank you so much for helping with this.
So if I had a cylinder that was super round and straight but was oversized diametrically, I could still have good cylindricity but just out of tolerance on the diameter. What is the tolerance zone based on? The size of the physical part or the cad model?
The tolerance zone of what?
The tolerance zone of the diameter is based on whatever means it's communicated. It can be controlled by the blueprint callout, the CAD model if that model is used as the master definition, etc. That's drawing/company specific.
If you're talking about the cylindricity tolerance zone, see the image above that Malgorzata posted. It's 2 concentric cylinders spaced apart by the tolerance called out, best fit around the cylinder releasing all 6 degrees of freedom, which all points must lie within.
For cylindricity the tolerance zone is dynamic, meaning it is two cylinders of perfect form that can both grow and shrink simultaneously. The upper boundary will contact the UAME (unrelated Actual Mating Envelope) - so it will be external to material, tangential to the high point(s). The lower boundary will be coaxial to the upper boundary and offset inwards by the cylindricity tolerance amount.
Under ASME, the form of the feature can not exceed the boundaries of size - which is why we report UAME and local size with the Geometric Tolerance command. UAME captures the mating envelope (largest size, external to material for and O/D) and local size captures the other size limit (smallest size for an O/D). The difference between the UAME and local size would be the form. If required, the designer can add a cylindricity requirement to further refine things and restrict the form by more than the size tolerance alone allows.
Sorry, I meant tolerance zone for cylindricity. Thank you for all of you help.
Wait, so a cylinder diameter that is larger than the diametric tolerance will also be out of tolerance for cylindricity? I'm sorry I don't understand.
I think I figured it out. I did some testing offline creating circles with different diameters, constructing a cylinder and dimensioning cylindricity to see how the diameters of different sizes affect it.
No it doesn't
No. The diameter can be larger or smaller than it's supposed to be and it will fail it's size specification but, so long as the difference between the largest and smallest
Wait, so a cylinder diameter that is larger than the diametric tolerance will also be out of tolerance for cylindricity? I'm sorry I don't understand
No. What I meant was, under ASME, if no cylindricity tolerance is shown, then the size tolerance also controls the form and the maximum permissible form error cannot exceed the total size tolerance. For example, if your size tolerance was ±0.1, then the total allowable form deviation would be 0.2 - when the smallest measured diameter was exactly at the lower limit and the largest measured size was exactly at the upper limit.
Designers are allowed to further refine things by adding a cylindricity tolerance if required, but that cylindricity tolerance must be smaller than the total tolerance already specified for size. Using the same example as above, they could add a cylindricity tolerance that is less than 0.2 to control the form more tightly.
Cylindricity is simply the allowable range between the maximum and minimum size measurements. Those actual sizes can be oversize or undersize and the cylindricity could still pass, so long as the range between max and min did not exceed the cylindricity tolerance.
| © 2024 Hexagon AB and/or its subsidiaries. | Privacy Policy | Cloud Services Agreement |