hexagon logo

Spline Gages ???? What?

Good Morning ladies and gents,

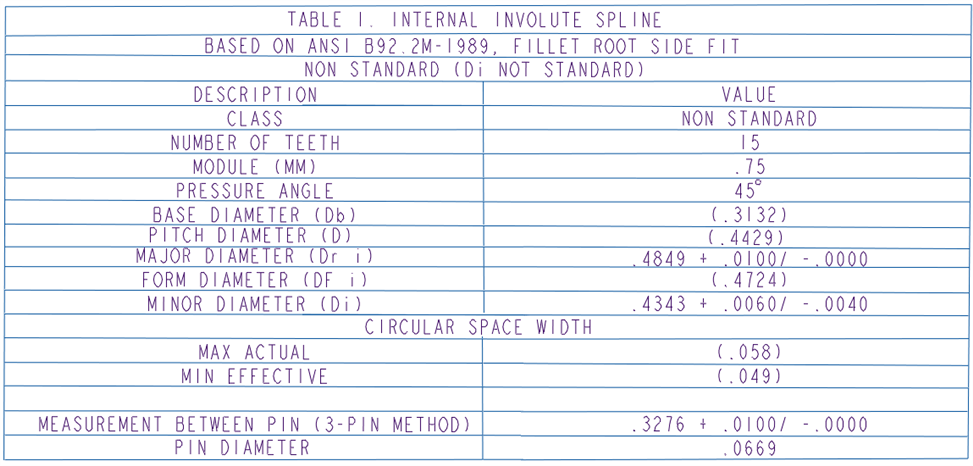
For those of you who have ordered Go/Nogo gages for splines... how do you confirm they are made correctly? Do you all have any information you can pass along to help me understand how to compare customer print with gage maker go/nogo print? I don't know a whole lot about spline gages or splines in general and would like to understand them a little better. I attached the part print for the spline of the part. Now how would i take this and determine the sizes/specs of a Involute spline go and nogo gage.ConfusedConfusedConfused

Thanks in advance


Parents


  • First: I am not going off of an assumption. I am going off of a certificate of conformance from an accredited facility. We do $30m+ yearly on these products & they're all critical safety components for aircraft & defense products that go to top tier customers. Drop the nerdrage Cheesey. The data on my PO is a direct copy & paste from my customer's technical specs.
    With all due respect, convincing your clearly undereducated co-workers is not my concern.

    Second: I believe you that the parts have changed. Do you have a way to prove it? Doesn't sound like it. If you want o make splines...you need to figure out what spec they need to be good to & then get appropriate gaging that is made out of the appropriate material to account for the non-avoidable wear that will occur when material rubs together.

    The things your struggling with are why companies like mine specialize in this stuff. If you change your energy I will help you further. Otherwise you can go p!ss up a rope dude.


    Sorry I didn't intend to come off as an ass. I am simply trying to grasp the process here and it seems I oversimplified. I am simply ignorant when it comes to splines.

    To clarify.... You send your customer specs (like the table I posted above, but also with the correct standard identified) to the accredited lab. They send you a Certificate of conformance. Justifiably this is enough to certify the gage is made correctly.

    What do you do when the specs of a gage are questioned? Have you been asked "How do we know the manufacturer made it correctly?" What would your response be to them at that point.

    And I agree with you... my coworkers and I are undereducated and probably don't deserve convincing, but I would like to understand. We have more splines coming down the pipeline and I would like to have some ground to stand on when I get push back from the QM and Engineers.

    About the parts changing. I do have ways to prove they have changed. We retain all PPAP parts, and force test data from each run. I have documented the trends of them changing. But our quality techs have changed their way of inspecting them over time. We used to put the go gage in from the top and push through the bottom. When the go gage stopped fitting they changed the process to be inserted from the bottom. We have also changed the way we do our force test. So multiple changes on their end is making it difficult to convince them. Even though I have PPAP samples, PPAP Data, and comparison parts from multiple dates when checked the way we checked them at PPAP shows an obvious change.

    However the QM has convinced everyone that its the go/nogo gage and not the spline as much. And they tasked me with confirming that it was made correctly to check our parts. And with my limited knowledge all i can say is "We gave them the specs and standard and they sent us a certificate of calibration so from my understanding its correct." which i'm sure they will want more than that.

    My whole point here is when I get a plug gage made for a hole. I can take the print and calculate the size of the plug gage with 100% confidence in my results. Is this possible with splines or am I looking for an answer that is better covered by telling them to call the manufacturer for their answers?

    I hope I cleared things up. feel free to call me an idiot and tell me to kick rocks lol

    One last thing. The go/nogo gages are in great condition. They are pushed through plastic parts and we have not ran them enough for wear of the gages to be an issue as of yet.
Reply


  • First: I am not going off of an assumption. I am going off of a certificate of conformance from an accredited facility. We do $30m+ yearly on these products & they're all critical safety components for aircraft & defense products that go to top tier customers. Drop the nerdrage Cheesey. The data on my PO is a direct copy & paste from my customer's technical specs.
    With all due respect, convincing your clearly undereducated co-workers is not my concern.

    Second: I believe you that the parts have changed. Do you have a way to prove it? Doesn't sound like it. If you want o make splines...you need to figure out what spec they need to be good to & then get appropriate gaging that is made out of the appropriate material to account for the non-avoidable wear that will occur when material rubs together.

    The things your struggling with are why companies like mine specialize in this stuff. If you change your energy I will help you further. Otherwise you can go p!ss up a rope dude.


    Sorry I didn't intend to come off as an ass. I am simply trying to grasp the process here and it seems I oversimplified. I am simply ignorant when it comes to splines.

    To clarify.... You send your customer specs (like the table I posted above, but also with the correct standard identified) to the accredited lab. They send you a Certificate of conformance. Justifiably this is enough to certify the gage is made correctly.

    What do you do when the specs of a gage are questioned? Have you been asked "How do we know the manufacturer made it correctly?" What would your response be to them at that point.

    And I agree with you... my coworkers and I are undereducated and probably don't deserve convincing, but I would like to understand. We have more splines coming down the pipeline and I would like to have some ground to stand on when I get push back from the QM and Engineers.

    About the parts changing. I do have ways to prove they have changed. We retain all PPAP parts, and force test data from each run. I have documented the trends of them changing. But our quality techs have changed their way of inspecting them over time. We used to put the go gage in from the top and push through the bottom. When the go gage stopped fitting they changed the process to be inserted from the bottom. We have also changed the way we do our force test. So multiple changes on their end is making it difficult to convince them. Even though I have PPAP samples, PPAP Data, and comparison parts from multiple dates when checked the way we checked them at PPAP shows an obvious change.

    However the QM has convinced everyone that its the go/nogo gage and not the spline as much. And they tasked me with confirming that it was made correctly to check our parts. And with my limited knowledge all i can say is "We gave them the specs and standard and they sent us a certificate of calibration so from my understanding its correct." which i'm sure they will want more than that.

    My whole point here is when I get a plug gage made for a hole. I can take the print and calculate the size of the plug gage with 100% confidence in my results. Is this possible with splines or am I looking for an answer that is better covered by telling them to call the manufacturer for their answers?

    I hope I cleared things up. feel free to call me an idiot and tell me to kick rocks lol

    One last thing. The go/nogo gages are in great condition. They are pushed through plastic parts and we have not ran them enough for wear of the gages to be an issue as of yet.
Children
No Data