hexagon logo

Scan results different from keyed-in points

I have a part with a very tight profile tolerance (form+location) of .0005. I wrote a program with a model and aligned to all 3 datums.

I keyed in gage points and read the vectors from the model. Part is out of tolerance (which I expected) by about .001, the profile being off center.

Next I added a linear TTP scan along the same section where I probed the gage points. The scan shows deviations up to .018!Confused Same program, same part, same alignment.

What could I be doing wrong with my scan to get a result that differs so much from my keyed-in points?
  • Yes that is why I stated the only place with a 0.470 radius is at the parallel section A - A . The part is bell/ trumpet shaped after the 0.333 cylinder and not a curve with a constant 0.470 radius along its edge as as stated by the OP.That is unless the drawing/sketch is not the same as what he is checking.
  • The first is the datum setup on the drawing it is very confusing and in ISO land ilegal, datum ' B ' is about the only one that could be taken as correct, 'A' and 'C' are a joke. You need to have the engineer/customer state what feature are to be used for the datum setup before you can obtain any meaningful results.


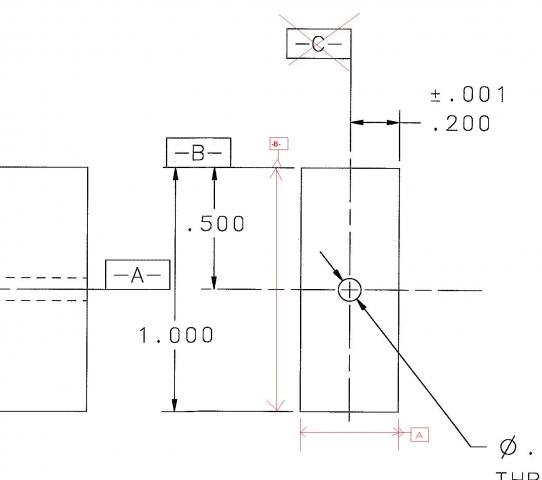
    I did talk to engineering about this. The result was that the 1" faces of the right end are the datum -A- feature (I aligned this by measuring planes on both faces and constructing a midplane), similarly the .400 faces are datum -B-, and datum -C- is the small face at the left side.

    You are right about the radius; I made a sloppy assumption about that. The .470 only exists at section A-A. It blends smoothly into the .333 diameter. I confirmed this with a gage.
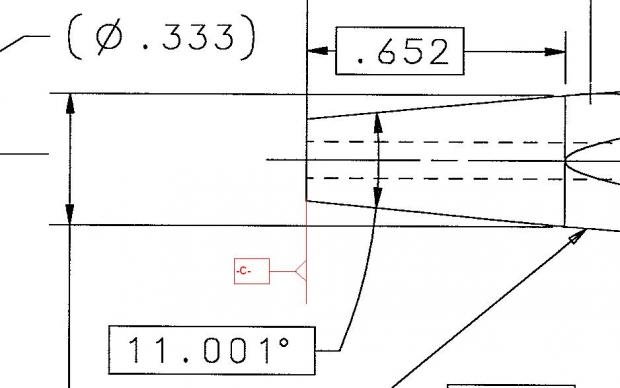
  • when you take a hit on the .652 and .333 what are your actuals?

    The .470R you can check as a radius


    I have aligned the part so Z+ is toward the small end on the left, X+ is toward the tapered side on top.

    On one side that GP reads: <0.6858,0.2245,-0.6521><1.0000,-0.0000,-0.0000> DEV -0.0002
    The opposite side: <0.3525,0.2201,-0.6521><-1.0000,0.0000,-0.0000> DEV .0006

    Thanks for making me take a closer look at these, WolfMan. I really had only been looking at the deviations, not the XYZs. I don't know why they look like this. Y should be 0, and X should be equidistant from 0, yet the deviations are so small. I'm reading off the report from the first program I mentioned above. Don't have a printout from the subsequent ones, but I'll have to open up the program when my machine is free today.
  • I did talk to engineering about this. The result was that the 1" faces of the right end are the datum -A- feature (I aligned this by measuring planes on both faces and constructing a midplane), similarly the .400 faces are datum -B-, and datum -C- is the small face at the left side.

    You are right about the radius; I made a sloppy assumption about that. The .470 only exists at section A-A. It blends smoothly into the .333 diameter. I confirmed this with a gage.


    To be honest I dont understand what you mean by the .400 faces. From the looks of it -A- is a cylindrical feature, yet you are Leveling to the Face? If thats the case, why are you creating a mid plane? Unless the engineer changed the datums completely. The print is not very good, but it seems that -A- is (Ø.093) is the center of the part, -B- is the OD ( Also a center of the part), -C- is the right face. So If it was me, would measure the ID .093, Level to it in Z+, Set my XY orgin, then use the tapered face for Z orgin.


    On one side that GP reads: <0.6858,0.2245,-0.6521><1.0000,-0.0000,-0.0000> DEV -0.0002 <---- on the print at .652 the radius is .166, and you are getting .2245? Also, your vector dont seem to be correct, the part is not flat there for it should not be 1 ,0,0
    The opposite side: <0.3525,0.2201,-0.6521><-1.0000,0.0000,-0.0000> DEV .0006
  • To be honest I dont understand what you mean by the .400 faces. From the looks of it -A- is a cylindrical feature, yet you are Leveling to the Face? If thats the case, why are you creating a mid plane? Unless the engineer changed the datums completely. The print is not very good, but it seems that -A- is (Ø.093) is the center of the part, -B- is the OD ( Also a center of the part), -C- is the right face. So I would place the part so that the front is the tapered Ø, Level to either -A- or -B- depending on the function, and -C- for the Y zero.


    I agree that the print is bad. I have had the datums changed by engineering, and I will try and clarify that. First, a little more detail about the part...

    This part is an electrode for EDM. The rectangular side on the right is where the electrode loads into the toolholder. The center hole is for flushing, and has no effect on the geometry of the part being manufactured. The intent of the engineer was to control the profile from centerline to make it symetrical; that way the electrode could be loaded either side up and still make a good part.

    The outcome is that datum -A- was clarified: it was not intended to be the center hole, but the center plane (yes, it was poorly drawn) parallel to the long edge of the rectangle (right-hand view, 1.000 dim). The attached pic shows the change. The .400 face to which I was referring is the shorter edge in the same view. Datum -C- must be the face on the left end because all of the gage points are dimensioned from it.

    So, when looking at my actuals for the GP you asked about earlier, I would expect to see <0.1666,0,-.652>, since the X and Y origins are on C/L and Z origin is on the left face. The vector was read from the model. My guess is there is some infinitely small flat in the computed geometry of that section.


  • I agree that the print is bad. I have had the datums changed by engineering, and I will try and clarify that. First, a little more detail about the part...

    This part is an electrode for EDM. The rectangular side on the right is where the electrode loads into the toolholder. The center hole is for flushing, and has no effect on the geometry of the part being manufactured. The intent of the engineer was to control the profile from centerline to make it symetrical; that way the electrode could be loaded either side up and still make a good part.

    The outcome is that datum -A- was clarified: it was not intended to be the center hole, but the center plane (yes, it was poorly drawn) parallel to the long edge of the rectangle (right-hand view, 1.000 dim). The attached pic shows the change. The .400 face to which I was referring is the shorter edge in the same view. Datum -C- must be the face on the left end because all of the gage points are dimensioned from it.

    So, when looking at my actuals for the GP you asked about earlier, I would expect to see <0.1666,0,-.652>, since the X and Y origins are on C/L and Z origin is on the left face. The vector was read from the model. My guess is there is some infinitely small flat in the computed geometry of that section.


    AHH, ok that makes more sense. Well, the Actuals are way off, so there must be something wrong there. When you look at the .652 area does it looks like its flat??? Because it sure doesn't from where I am. I dont think your vectors are correct and that is why I think you are having problems.

    Also, why is your Y-value is not Zero?, I would start with first point having Y-Zero, then the rest

    Do this:
    Open a surface point feature, plug in your values .166, 0, .652, select 3 sample hits .0005 (it may change to .001, its ok), it will show a vector on the CAD, click find Vectors, make sure the vector points in the right direction, then run it and post the NOMINALS, TARGET and VALUES
  • After creating a handful of different programs (and comparing results from different alignment strategies), my problem is pretty consistent: profiles from keyed-in points are showing different results from profiles of a scan. The results are similar, but deviations appear exaggerated during the scan (TTP). I had the engineer look at my results, and he basically told me that since it was a test part we would let them go for now. Problem delayed, not solved.

    Incidentally, I had been talking with the head engineer about DCI versus translating models into STEP format. He told me that their CAD software has a "rounding" problem. In short, while the print dimensions are neatly rounded, the CAD dimensions may be off a few tenths or so - in the native CAD! A few checks of my translated model compared to his native model compared to the print confirm this: the model does not have the same dimensions as the print.

    This is going to start a very interesting discussion regarding whether the model or the print is master. For most of our parts, deviations this small won't matter substantially. On the part I was trying to inspect here (profiles of .0005), this makes or breaks the inspection program.

    Thanks to everyone for you help.