hexagon logo

Report reading for enigneers

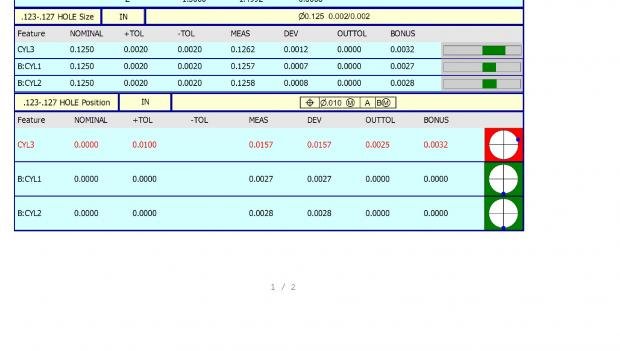
Today the engineers are bothering me asking me how they can know what direction on the part the hole is out of tolerance. Like shown in the attachment. They like focusing on the graphical depiction of the out of tolerance.

To be honest i'm not really sure how I can express to them how that shows what direction. I believe it is based on the alignment the part is dimensioned to. Is there some help file/guide I can point them (and myself) to? I can see there is an out of tolerance go into the program and zoom in on the feature and see in where it is compared to where it should be, but that doesn't help the engineers reading the report. Them being able to figure it out instead of coming to the lab and emailing me would be great. So any help or insight on this guys? Thanks in advance!
Parents
  • aircraft

    Did you pick up on sealevels comment?
    Do not use . - / * = + or anything like this in a feature name or variable name.
    You have .123-.127 HOLE Size this is a no no also there should NEVER be any spaces between words use _ if you need to.
    This will mess you up some day PCDMIS don’t like it.


    Maybe P250_HOLE_4 and DATUM_A


    AL
Reply
  • aircraft

    Did you pick up on sealevels comment?
    Do not use . - / * = + or anything like this in a feature name or variable name.
    You have .123-.127 HOLE Size this is a no no also there should NEVER be any spaces between words use _ if you need to.
    This will mess you up some day PCDMIS don’t like it.


    Maybe P250_HOLE_4 and DATUM_A


    AL
Children
No Data