hexagon logo

Distance between 2 concentric cirlces

Good morning all,

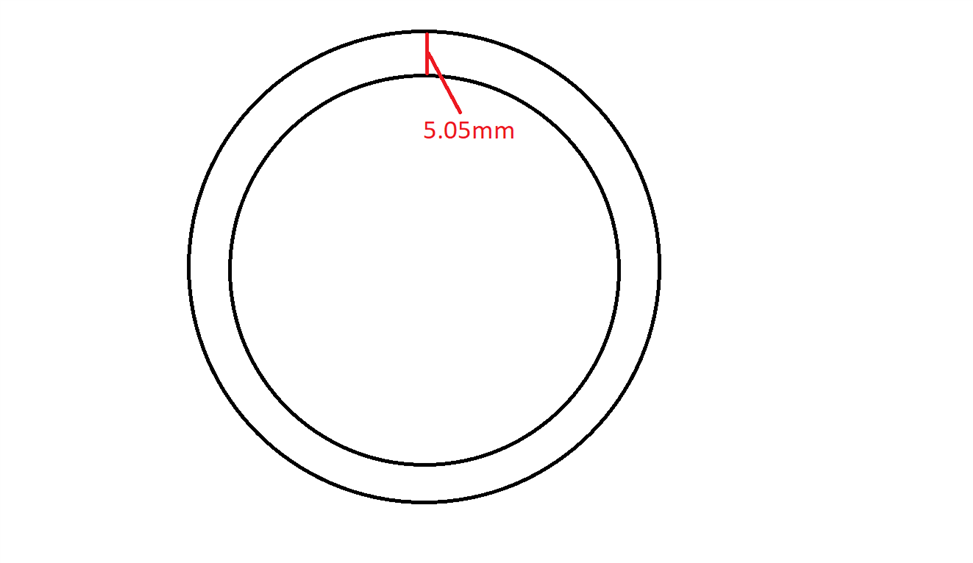
I am having a bit of an issue trying to measure 2 concentric circles and get the distance between the two. No matter what work plane or measurement strategy, I cannot get the measurement I am looking for. I have attached a simple drawing of what exactly I am trying to do. Even in an offline environment straight from the CAD, I am not getting the 5.05 I am looking for. What I am currently doing to get this measurement is taking a a point at X-0 on both circles and calling the distance that way. The issue with that is we have a very small tolerance (-0, +0.05mm) and I am not getting repeatable results using this method. If anyone here as some insight on what I might be doing incorrectly that would be fantastic!

Thanks!
Parents
  • This is my go to for checking the thickness of a tube.
    It isnt quite the same as checking the thickness with a pair of pin mics or something because it is just using the diameters to calculate the thickness. For a tight tolerance you might want to use method or just take a point on the inside and one in the exact same locations on the outside and do a 3d distance to them in various locations

    CIR1 =FEAT/CONTACT/CIRCLE/DEFAULT,CARTESIAN,IN,LEAST_SQR
    THEO/<0,0,0>,<0,0,1>, 7.35
    ACTL/<0,0,0>,<0,0,1>,7.35
    TARG/<0,0,0>,<0,0,1>
    START ANG=0,END ANG=360
    ANGLE VEC=<1,0,0>
    DIRECTION=CCW
    SHOW FEATURE PARAMETERS=NO
    SHOW CONTACT PARAMETERS=NO
    CIR2 =FEAT/CONTACT/CIRCLE/DEFAULT,CARTESIAN,IN,LEAST_SQR
    THEO/<0,0,0>,<0,0,1>, 6.35
    ACTL/<0,0,0>,<0,0,1>,6.35
    TARG/<0,0,0>,<0,0,1>
    START ANG=0,END ANG=360
    ANGLE VEC=<1,0,0>
    DIRECTION=CCW
    SHOW FEATURE PARAMETERS=NO
    SHOW CONTACT PARAMETERS=NO
    ASSIGN/ V1= (CIR1.D.MEAS-CIR2.D.MEAS)/2
    F1 =GENERIC/LINE,DEPENDENT,CARTESIAN,$
    NOM/XYZ,<0,0,0>,$
    MEAS/XYZ,<0,0,0>,$
    NOM/IJK,<0,0,1>,$
    MEAS/IJK,<0,0,1>,$
    DISTANCE/ V1,V1
    DIM LOC1= LOCATION OF LINE F1 UNITS=IN ,$
    GRAPH=OFF TEXT=OFF MULT=10.00 OUTPUT=BOTH HALF ANGLE=NO
    AX NOMINAL MEAS +TOL -TOL DEV OUTTOL
    L 0.5000 0.5000 0.2000 0.2000 0.0000 0.0000 ----#----
    END OF DIMENSION LOC1
Reply
  • This is my go to for checking the thickness of a tube.
    It isnt quite the same as checking the thickness with a pair of pin mics or something because it is just using the diameters to calculate the thickness. For a tight tolerance you might want to use method or just take a point on the inside and one in the exact same locations on the outside and do a 3d distance to them in various locations

    CIR1 =FEAT/CONTACT/CIRCLE/DEFAULT,CARTESIAN,IN,LEAST_SQR
    THEO/<0,0,0>,<0,0,1>, 7.35
    ACTL/<0,0,0>,<0,0,1>,7.35
    TARG/<0,0,0>,<0,0,1>
    START ANG=0,END ANG=360
    ANGLE VEC=<1,0,0>
    DIRECTION=CCW
    SHOW FEATURE PARAMETERS=NO
    SHOW CONTACT PARAMETERS=NO
    CIR2 =FEAT/CONTACT/CIRCLE/DEFAULT,CARTESIAN,IN,LEAST_SQR
    THEO/<0,0,0>,<0,0,1>, 6.35
    ACTL/<0,0,0>,<0,0,1>,6.35
    TARG/<0,0,0>,<0,0,1>
    START ANG=0,END ANG=360
    ANGLE VEC=<1,0,0>
    DIRECTION=CCW
    SHOW FEATURE PARAMETERS=NO
    SHOW CONTACT PARAMETERS=NO
    ASSIGN/ V1= (CIR1.D.MEAS-CIR2.D.MEAS)/2
    F1 =GENERIC/LINE,DEPENDENT,CARTESIAN,$
    NOM/XYZ,<0,0,0>,$
    MEAS/XYZ,<0,0,0>,$
    NOM/IJK,<0,0,1>,$
    MEAS/IJK,<0,0,1>,$
    DISTANCE/ V1,V1
    DIM LOC1= LOCATION OF LINE F1 UNITS=IN ,$
    GRAPH=OFF TEXT=OFF MULT=10.00 OUTPUT=BOTH HALF ANGLE=NO
    AX NOMINAL MEAS +TOL -TOL DEV OUTTOL
    L 0.5000 0.5000 0.2000 0.2000 0.0000 0.0000 ----#----
    END OF DIMENSION LOC1
Children