I reset all the probes in the rack and re-qualified them.
Run a program and get results that don't match what I had before calibration and don't match my customer.
One probe (2mm ball on a 62mm carbide shank that is 1.5mm diameter) has me worried it might be shanking, so I get a compound swivel and tram the thing plumb.
Reset the build and requalify all positions.
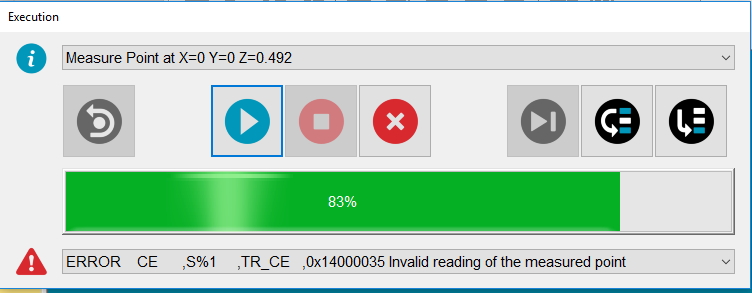
One position gives me the error attached. The head rotates, rapids to approach, rapid feeds in to about a quarter inch off the sphere (I have a .22 approach/retract in the cal window, so this is ok) and that error. The probe never moves to contact the sphere, just throws the error. Twice in a row, same position. ONLY that one position. I MAN+DCC and it quals.
After, the results from a part program are not good.
Ran a part on another PcDmis machine get results I expect.
Programmed it on a Mitutoyo machine, results match within .0005".
Run on the machine with the potential problem, it has different results by .015 on one axis only.
I then reset all the probes in the rack and requalify. Maybe I made a mistake. Maybe when I got that error and saved partial something happened, I don't know, so I do it all over.
No errors on any styli in any positions.
I run that part again, and it is now off .010 on one axis only.
I get a 20" gage block.
I make a three plane alignment, primary the end of the gage block and measure the length on X with a 5X90 stylus that I aligned the part in the program with. I measure the block length, .0001" off.
Switch to the 2mm stylus described above, .0001". Rotate to A45 B-45. .0001".
Spin the block along the Y axis.
Same thing.
5X90 is off .0001".
2mm probe off .0014".
Rotate to A45 B45 so no chance it is shanking, it is off .0015".
I delete the 2mm probe file completely.
Rebuild from scratch.
Try to qualify A0 B0 and get that stupid error again.
Try to move to change out on the rack and pushing the dead man's switch elicits a beep while the switch is depressed.
PcDmis stops working, crash to desktop.
Again, the head was at A0 B0 so no rotation there, the machine just rapids to some 4" over the sphere or something, then rapids down to about .25" over the sphere and stops with that error. It never makes the move at contact speed to try and touch anything. There is no contact speed motion, just rapids.
This probe had 86 positions before I deleted it. It qualified all the positions by itself lights out after the machine was calibrated. Then when I added the swivel, one position ONLY of those 86 gave me this error. Then, when I cleared the results and ran the qualification again yesterday, all 86 positions went through DCC+DCC with no errors. This is intermittent and I don't remember ever seeing it before.
The machine is 18 months old. I'm not the only one to run it, but this wasn't reported to me. Could it have happened and no one told me, ABSOLUTELY!
My extremely long winded question is, does this sound like a probe file problem and I'm on the right track, or does it sound like a head problem or does it sound like a machine calibration problem?
I'm going to continue with the stupid probe file, but if I'm beating my head on the wall over something that isn't the issue, and someone has an inkling of what it is, I'd like to know.
Thank you


