hexagon logo

Projected Tolerance Zone

I've seen this question asked, but I can't find an answer to my specific question. It used to be that the FCF would have a P modifier in it to indicate you need to project your feature. As of late I'm seeing "TOL. ZONE PROJ. .620". Are the two methods of doing this different, or just a horse of a different color?

If I select "axis average" and enter .620 in the box on a cylinder, I can see the projected length in the dimension. I don't see that same thing if I use it on a circle. I'm using legacy for this in 2022.2. I've seen others say you can use it from a drop down box in Geometric Tolerancing, but I don't see an option for that in there.

Last question. Can you create a generic plane, dependent on the datum plane, add 0.62" to the location, then construct circles between the bolt hole pattern the generic projected plane to get the same result?

Either way, if someone could help me figure out the "right" way to do this, I'd appreciate it. See attached image please.

Thank you

Attached Files
Parents
  • You need a cylinder feature in order to project. The text in the dialog should give you a hint (axial features) :P
    No, that won't work - again, you need the holes to be cylinders for the projection to work.
  • You need to measure the holes as cylinders to ensure you capture their true orientation. If you measure circles, they simply inherit their orientation from the workplane (measured circles), from the THEO surface vector (Auto-Features) or from the sample plane (Auto-Features with 3 or more sample hits / sample feature selected). If you don't have the hole's true orientation then you are not getting the right answer when you project because the projection is supposed to be along the feature's true axis.

    If you are using legacy, selecting "from axis average" is not correct either, you need to select "from worst end of axis".
    If you want to use the Geometric Tolerance command, make sure you have measured auto-cylinders and then pick the P modifier in the feature control frame builder.

    These are extracts from the Geometric Tolerance help...

    Position - Allowed Modifiers
    -------------------------------------
    When the considered feature is an Auto feature cylinder, you can use a projected-zone modifier (P). This projects (extrapolates) the measured feature axis as described in "Deriving the Toleranced Feature".


    Deriving the Toleranced Feature.
    -------------------------------------------
    Cylindrical Features with Surface Data under ASME Y14.5
    The toleranced feature is an axis when the considered feature is a cylinder. Under ASME Y14.5, when a cylindrical feature has surface data, the toleranced feature is constructed in the following way:

    First, a fit type is selected, based on the feature math type (DEFAULT or LSQ) and on the material modifier. The LSQ math type always does a least-squares best fit. The DEFAULT math type does an inscribed or circumscribed best fit. When the material modifier is RFS (no material modifier) or MMC, the inscribed or circumscribed fit is chosen to be external to the material. When the material modifier is LMC, the inscribed or circumscribed fit is chosen to be internal to the material. Thus, the DEFAULT math type usually produces the unrelated actual mating envelope (UAME) unless the modifier is LMC. In that case, the math type produces the unrelated actual minimum material envelope (UAMME). Since traditional inscribed and circumscribed fits are notoriously unstable, PC-DMIS uses a constrained least squares algorithm to compute the inscribed or circumscribed fit in a stable way.

    Second, an extrapolation is selected. It is based on whether a sample plane is available and whether a projected-zone modifier is present:

    When there is no sample plane, and there is no projected zone modifier, the best-fit axis is extrapolated to the nominal end-faces of the cylinder. The nominal end-faces of the cylinder are nominally oriented and located to the measured datums. If there is a projected zone modifier, the extrapolation starts at the nominal start-face of the cylinder. It continues away from the end-face, until it hits the nominal projection plane parallel to the start plane at the projected distance away from it.

    When there is a sample plane, the extrapolation starts at the measured start plane.

    The extrapolated best-fitted axis is the toleranced feature.
  • Hey Neil, quick question regarding the info above:  Sometimes when I'm measuring internal threads and want to lock into the pitch diameter, we'll use JoPlugs which means I end up probing outside of the actual hole.  If a projected zone is being called out while using JoPlugs/probing outside of the actual hole, will it still extrapolate from inside the hole as stated above?

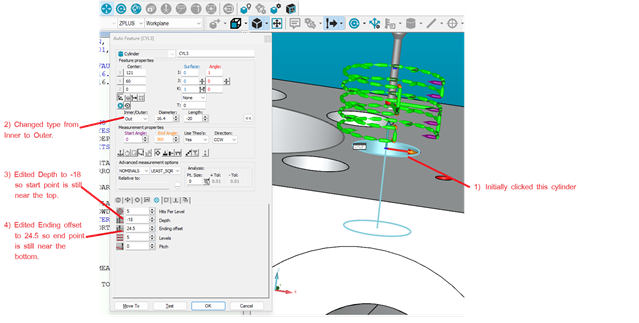
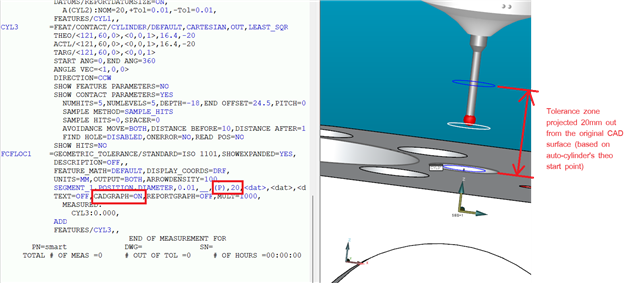
  • It depends how you've programmed it.  If you use an auto-cylinder and select the hole on the CAD model, then change the type from inner to outer and edit the depth/ending offset, it should work.  However, if you edit the X,Y,Z,I,J,K or length then the theoretical start and end points will be wrong.  Turning CAD graphics on in the position dimension will let you see where the tolerance zone is and determine if it's right or not.

    In the following example, I selected the CAD and then made edits so that the the theoretical start and end points and the measurement direction remained the same (top to bottom)...

    Turning on CAD graphics in the Geometric Tolerance dimension shows the correctly projected tolerance zone...

  • Thanks, man, I really appreciate the info.  I typically will do what you said regarding changing inner to outer while altering my depth/ending offset.  The only nominal I ever change in that scenario is the diameter (bc the JoPlug diameters always vary).  I never utilized the CAD graphics in the Geo Tol dimensioning, though, and that's something I'll be doing moving forward.  I also appreciate the visual aids.  Thanks again.

Reply
  • Thanks, man, I really appreciate the info.  I typically will do what you said regarding changing inner to outer while altering my depth/ending offset.  The only nominal I ever change in that scenario is the diameter (bc the JoPlug diameters always vary).  I never utilized the CAD graphics in the Geo Tol dimensioning, though, and that's something I'll be doing moving forward.  I also appreciate the visual aids.  Thanks again.

Children
No Data