hexagon logo

Help with Profile of surface using FARO

I have a faro arm and we recently upgraded to PC-DMIS, still getting used to the software, I have encountered this one problem.. I have to measure the profile of a gasket surface. There are two things needed here,
1st- the profile of the gasket surface
2nd - height of "inspection points" from datum (A) in Z axis
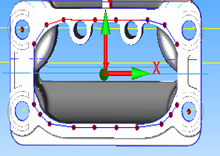
Now the inspection points are present on the CAD. The screen shot is attached.
I used "vector points" to construct the points as shown on the surface. The alignment was Iterative, using three datums, the gasket surface plane (A), the hole on the top left corner (B) and the hole on the bottom right corner (C). When I execute this program, the alignment looks ok, the plane and the circles align properly, but when I try and measure the vector points, the measured points somehow get projected away from the surface! Cannot figure out what I am doing wrong! Can anyone help me with this please? Thanks

AD

Attached Files
Parents
  • Kami,

    The gasket surface is not flat. It has a "Crown" that makes a bow on the top and the bottom surfaces. On the vector points, the Z distance keeps changing, so these points become my inspection points. As you will notice, there is quite a bit of deviation in the distances. The theoretical thickness was actually on zero for the points. You have highlighted the Z value for circle 1. Should the value have been zero?
Reply
  • Kami,

    The gasket surface is not flat. It has a "Crown" that makes a bow on the top and the bottom surfaces. On the vector points, the Z distance keeps changing, so these points become my inspection points. As you will notice, there is quite a bit of deviation in the distances. The theoretical thickness was actually on zero for the points. You have highlighted the Z value for circle 1. Should the value have been zero?
Children
No Data