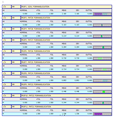
Call out was profile, tolerance 3mm to datum ABC.
engineering said that a cmm programmer at a different location said my report shows the part failing, I assume because he sees the measure is 2+ and the tolerance is showing plus/minus(1.5)
The measured feature at the top is a created group of points, the rest are the points dimensioned individually.
can I get some feed back on this? did I do it right or do I need to dimension it a different way?
I have seen videos on the new way of reporting profile, largest deviation multiply by 2. but that just adds confusion to me at this point
Attached Files

