hexagon logo

Softening Machine Lines

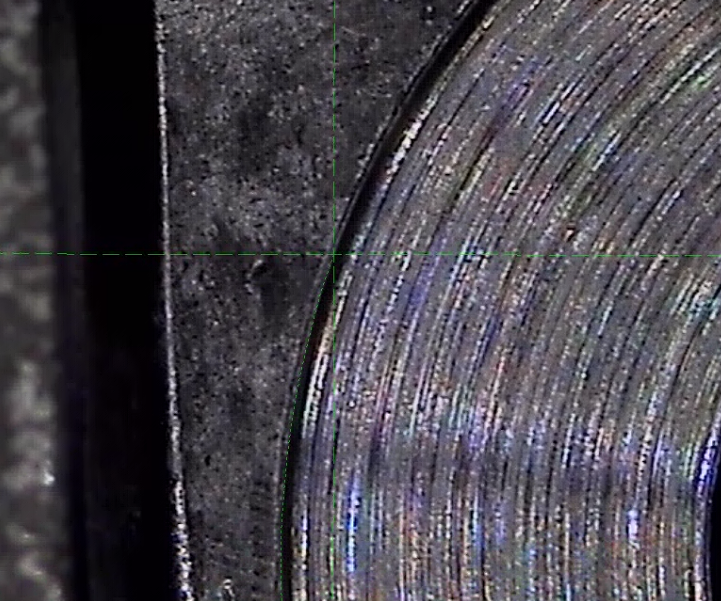
I like our Optiv 321GLtp, but one thing I have not been able to figure out is softening machine lines. The machine has a hard time deciphering between machine lines, the correct shadow, and the material to the left of the machined surface. This is at 1x zoom. We have another vision system that is zoomed out further, which in turn, "softens" the machine lines in order to pick up the edge correctly. We are going to try to implement that one to do these checks, but have not because there is a flatness callout on the machined surface. So the O ptiv is a one-stop-shop. I have tried top light, shutting off rings lights, filtering, RGB mixing, etc to automate the edge pickup. None of this works so it is a manual measurement.

Is there a way to soften those machine lines for the vision to grab the thin black shadow that is near the crosshairs?
Parents
  • Heh, happy to see that we have all the same difficulties on our optivs... Wink
    I'm often confronted to this, but like you i play with the detection options to find the "least bad" setting...
    Or, like you said, just turn to manual, using tiny targets to place by the user. After all, there is no harm to do it, the goal is to have the real edge. Sometimes i even mark the edges with some pen Sunglasses, especially on white parts.
    Anyway, i realize that it's pretty difficult to have repeatable measurements in visio !
    I mean, last week i began to validate a new 2D vision machine with a Type1 R&R (not done yet), and decided to apply it before on the Optiv just to see. I took 50 consecutive measurements on a 6mm calibrated ring, looks pretty easy on black/green contrast, but huh, there are sometimes 0.008mm gap between measures... R&R fails Rolling eyes
    I'm pretty sure that just by changing the illumination (going a bit overexposed) i'll divide the gap, but heh, hard to explain that to the quality guys !
    Let's be happy, look like visio machines will never replace our eyes Slight smile
Reply
  • Heh, happy to see that we have all the same difficulties on our optivs... Wink
    I'm often confronted to this, but like you i play with the detection options to find the "least bad" setting...
    Or, like you said, just turn to manual, using tiny targets to place by the user. After all, there is no harm to do it, the goal is to have the real edge. Sometimes i even mark the edges with some pen Sunglasses, especially on white parts.
    Anyway, i realize that it's pretty difficult to have repeatable measurements in visio !
    I mean, last week i began to validate a new 2D vision machine with a Type1 R&R (not done yet), and decided to apply it before on the Optiv just to see. I took 50 consecutive measurements on a 6mm calibrated ring, looks pretty easy on black/green contrast, but huh, there are sometimes 0.008mm gap between measures... R&R fails Rolling eyes
    I'm pretty sure that just by changing the illumination (going a bit overexposed) i'll divide the gap, but heh, hard to explain that to the quality guys !
    Let's be happy, look like visio machines will never replace our eyes Slight smile
Children
No Data