hexagon logo

Alignment from FCF Datum Shift


I think what vpt (and me) were hoping for was a way to create an alignment that uses the Xact fit shift. There are all sorts of applications for this. Using the available options in best-fit alignment is not the same, because they do not attempt to fit within a tolerance zone.

A few years old but I haven't found anything using search.

SPH1       =GENERIC/SPHERE,DEPENDENT,CARTESIAN,OUT,$
            NOM/XYZ,<0,0,0>,$
            MEAS/XYZ,<0,0,0>,$
            NOM/IJK,<0,0,1>,$
            MEAS/IJK,<0,0,1>,$
            DIAMETER/1,1.1
DIM LOC1= LOCATION OF SPHERE SPH1
AX    NOMINAL       +TOL       -TOL       MEAS        DEV     OUTTOL
D       1.0000     0.2500    -0.2500     1.1000     0.1000     0.0000 ------#--
END OF DIMENSION LOC1
            DATDEF/FEATURE=SPH1,A
            DISPLAYPRECISION/6
FCFLOC1 =POSITION : CIR152_1,CIR152_2,CIR152_3,...
            FEATCTRLFRAME/SHOWNOMS=NO,SHOWPARAMS=NO,SHOWEXPANDED=NO
              SIZE TOLERANCES/33,DIAMETER,0.375,0.005,-0.005
              PRIMARY DIMENSION/POSITION,DIAMETER,0.01,MMC,A,MMC,,
              NOTE/FCFLOC1
            FEATURES/CIR152_1,CIR152_2,CIR152_3,CIR152_4,CIR152_5,
                                CIR152_6,CIR152_7,CIR152_8,CIR152_9,CIR152_10,
                                CIR152_11,CIR152_12,CIR152_13,CIR152_14,
                                CIR152_15,CIR152_16,CIR152_17,CIR152_18,
                                CIR152_19,CIR152_20,CIR152_21,CIR152_22,
                                CIR152_23,CIR152_24,CIR152_25,CIR152_26,
                                CIR152_27,CIR152_28,CIR152_29,CIR152_30,
                                CIR152_31,CIR152_32,CIR152_33,,
            ASSIGN/V1=GETTEXT("DRF_SHIFTX",1,{FCFLOC1})
            ASSIGN/V2=GETTEXT("DRF_SHIFTY",1,{FCFLOC1})
            ASSIGN/V3=GETTEXT("DRF_SHIFTZ",1,{FCFLOC1})
            ASSIGN/V4=GETTEXT("DRF_ROTATIONX",1,{FCFLOC1})*-1
            ASSIGN/V5=GETTEXT("DRF_ROTATIONY",1,{FCFLOC1})*-1
            ASSIGN/V6=GETTEXT("DRF_ROTATIONZ",1,{FCFLOC1})*-1
            FORMAT/TEXT, , ,HEADINGS, , ;NOM,MEAS, , , , , 
DIM BEFORE= LOCATION OF CIRCLE CIR152_1
AX     NOMINAL        MEAS
X     10.153721   10.154507
Y    -27.402826  -27.405035
Z     -8.032519   -8.025360
END OF DIMENSION BEFORE
ALIGN1     =ALIGNMENT/START,RECALL:PREVIOUS,LIST=YES
              ALIGNMENT/ROTATE_OFFSET,V4,ABOUT,XPLUS
              ALIGNMENT/ROTATE_OFFSET,V5,ABOUT,YPLUS
              ALIGNMENT/ROTATE_OFFSET,V6,ABOUT,ZPLUS
              ALIGNMENT/TRANS_OFFSET,XAXIS,V1
              ALIGNMENT/TRANS_OFFSET,YAXIS,V2
              ALIGNMENT/TRANS_OFFSET,ZAXIS,V3
            ALIGNMENT/END
DIM AFTER= LOCATION OF CIRCLE CIR152_1
AX     NOMINAL        MEAS
X     10.151373   10.152161
Y    -27.394485  -27.396694
Z     -8.041472   -8.034312
D      0.376500    0.377383
END OF DIMENSION AFTER
            COMMENT/REPT,
            "Xshift:  "+V1
            "Yshift:  "+V2
            "Zshift:  "+V3
            "Rotation X:  "+V4*-1
            "Rotation Y:  "+V5*-1
            "Rotation Z:  "+V6*-1

The FCF output with datum shift is:


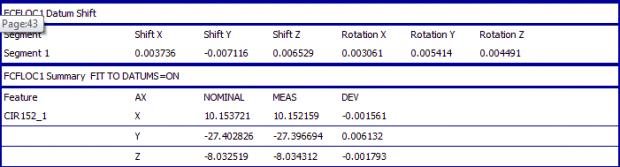
Using a sphere as the only datum seems to allow all 6 degrees to float. There is some small round-off error due to the numbers being used limited to the current DISPLAYPRECISION (not much).

Now what? Trying to actually use this has me baffled. I'd like to simulate the FCF output having the transformed measured coordinates evaluated against the model nominal values. The BEFORE dim has the nominals I want but the AFTER dim has the measured I want (like the FCF output). Inserting & Recalling alignments, Updating Dependent Commands (answering both yes and no) leaves me feeling like I've found my way into a rabbit hole. Maybe Profile dims behave differently?

I'm aware that some settings may influence the results: Update Dependent Commands (warning), UpdateBelowChangedAlignmentDuringExecution (registry), Ignore CAD to part (F5 settings), Allow Fine Tuning of Alignment (F5 settings). I'd really like to get this working inline without resorting to any type of external automation if possible. Can someone throw me a bone here? There's gotta be a way to get some mileage out of this.
  • The SUMMARY_MEAS enum has XYZ values strung one after the other. For this FCF with 33 features there ends up being 99 fields (33x3).

    3 of the features are selected from the FCF to provide spatial separation. The main thing is that they not be coincident or co-linear.

    FCF measured XYZ values are assigned to variables (these have received the FCF datum shift).

    Generic points for each of the 3 selected features are constructed.
    The nominals are assigned the FCF measured values.
    The measured values come from the measured values of the original feature
    The vectors are assigned from the measured feature (I don't think this really matters).

    A 3D bestfit alignment constructed from the 3 generic points...

    SPH1       =GENERIC/SPHERE,DEPENDENT,CARTESIAN,OUT,$
                NOM/XYZ,<0,0,0>,$
                MEAS/XYZ,<0,0,0>,$
                NOM/IJK,<0,0,1>,$
                MEAS/IJK,<0,0,1>,$
                DIAMETER/1,1.1
                DATDEF/FEATURE=SPH1,A
    FCFLOC1 =POSITION : CIR152_1,CIR152_2,CIR152_3,...
                FEATCTRLFRAME/SHOWNOMS=NO,SHOWPARAMS=YES,SHOWEXPANDED=YES
                  SIZE TOLERANCES/33,DIAMETER,0.375,0.005,-0.005
                  PRIMARY DIMENSION/POSITION,DIAMETER,0.01,MMC,A,MMC,<size>,<dat>,<dat>
                  SECONDARY DIMENSION/<Dim>,<tol>,<MC>,<dat>,<dat>,<dat>
                  NOTE/FCFLOC1
                FEATURES/CIR152_1,CIR152_2,CIR152_3,CIR152_4,CIR152_5,
                                    CIR152_6,CIR152_7,CIR152_8,CIR152_9,CIR152_10,
                                    CIR152_11,CIR152_12,CIR152_13,CIR152_14,
                                    CIR152_15,CIR152_16,CIR152_17,CIR152_18,
                                    CIR152_19,CIR152_20,CIR152_21,CIR152_22,
                                    CIR152_23,CIR152_24,CIR152_25,CIR152_26,
                                    CIR152_27,CIR152_28,CIR152_29,CIR152_30,
                                    CIR152_31,CIR152_32,CIR152_33,,
    $$ NO,
                * 1st feature in FCF
                ASSIGN/BF1_X=GETTEXT("SUMMARY_MEAS",1,{FCFLOC1})
                ASSIGN/BF1_Y=GETTEXT("SUMMARY_MEAS",2,{FCFLOC1})
                ASSIGN/BF1_Z=GETTEXT("SUMMARY_MEAS",3,{FCFLOC1})
    $$ NO,
                * 11th feature in FCF
                ASSIGN/BF2_X=GETTEXT("SUMMARY_MEAS",31,{FCFLOC1})
                ASSIGN/BF2_Y=GETTEXT("SUMMARY_MEAS",32,{FCFLOC1})
                ASSIGN/BF2_Z=GETTEXT("SUMMARY_MEAS",33,{FCFLOC1})
    $$ NO,
                * 24th feature in FCF
                ASSIGN/BF3_X=GETTEXT("SUMMARY_MEAS",70,{FCFLOC1})
                ASSIGN/BF3_Y=GETTEXT("SUMMARY_MEAS",71,{FCFLOC1})
                ASSIGN/BF3_Z=GETTEXT("SUMMARY_MEAS",72,{FCFLOC1})
    $$ NO,
                * 1st feature in FCF
    PT_BF1     =GENERIC/POINT,DEPENDENT,CARTESIAN,$
                NOM/XYZ,<BF1_X,BF1_Y,BF1_Z>,$
                MEAS/XYZ,<CIR152_1.X,CIR152_1.Y,CIR152_1.Z>,$
                NOM/IJK,<CIR152_1.TI,CIR152_1.TI,CIR152_1.TK>,$
                MEAS/IJK,<CIR152_1.TI,CIR152_1.TI,CIR152_1.TK>
    $$ NO,
                * 11th feature in FCF
    PT_BF2     =GENERIC/POINT,DEPENDENT,CARTESIAN,$
                NOM/XYZ,<BF2_X,BF2_Y,BF2_Z>,$
                MEAS/XYZ,<CIR152_11.X,CIR152_11.Y,CIR152_11.Z>,$
                NOM/IJK,<CIR152_11.TI,CIR152_11.TJ,CIR152_11.TK>,$
                MEAS/IJK,<CIR152_11.TI,CIR152_11.TJ,CIR152_11.TK>
    $$ NO,
                * 24th feature in FCF
    PT_BF3     =GENERIC/POINT,DEPENDENT,CARTESIAN,$
                NOM/XYZ,<BF3_X,BF3_Y,BF3_Z>,$
                MEAS/XYZ,<CIR152_24.X,CIR152_24.Y,CIR152_24.Z>,$
                NOM/IJK,<CIR152_24.TI,CIR152_24.TJ,CIR152_24.TK>,$
                MEAS/IJK,<CIR152_24.TI,CIR152_24.TJ,CIR152_24.TK>
    $$ NO,
                * 
    ALIGN3     =ALIGNMENT/START,RECALL:PREVIOUS,LIST=YES
                  ALIGNMENT/BF3D,LEAST_SQR,CREATE WEIGHTS=NO,ROTANDTRANS,USE SCALING=NO,0.003736,-0.007117,0.00653,-0.004491,-0.00306,-0.005415
                  ITERATEANDREPIERCECAD=NO
                  Deviation Threshold=0.002
                  SHOWALLINPUTS=YES,SHOWALLPARAMS=YES
                    ID=PT_BF1,Points,,1,YES,YES,YES,YES
                    ID=PT_BF3,Points,,1,YES,YES,YES,YES
                    ID=PT_BF2,Points,,1,YES,YES,YES,YES
                    ID=


    I tried stuffing the GETTEXT commands directly into the generic points but it wouldn't take. This requires just a little more effort than the datum shift approach but may be more appropriate for some.

    A "feature" of this is that it appears to provide the alignment DJAMS was interested in.

    I've only been able to try this on a few datasets but it seems to be working repeatably. If anyone comes across any surprises please share. This is a work in progress - consider it a beta version.

    "Use with caution and only when allowed by engineering requirements (dwg or MBD)"


    Tried your luck adressing the devs directly, Gomo?

    I think vpt knew more than he let on but I'm glad he let me stumble around.
  • AndersI is definitely correct about not using the Datum Shift method. Although working for me when all 6 degrees are in play something behaves differently when one or more of the values are "Fixed". In practical use this will most likely always be the case so I have to suggest not using it unless you can validate the results are correct. A couple of things could be causing this but I haven't narrowed down the culprit yet. Many thanks to AndersI for pointing this out.

    The 2nd method I posted a week ago seems stable as it's basically just a 3 point to 3 point transformation PcDmis performs itself. I was able to automate the code insertion and add support for the 2nd tier of a composite FCF. Using "rotating calipers" helps to seed pre-selection of the 3 features used for spatial separation. This helped in testing more datasets.

    I need to apologize to all for not thoroughly testing the code in the initial post. I was hoping to make life easier and instead did the exact opposite. I apologize. I wish I could say it won't happen again but I will be more careful in the future.

    GomoSlower
  • Edit: Or maybe I'm thinking the wrong way about this - you're using shifted meas values compared to original meas values, no original theos involved, so the actual errors in the location of the holes are irrelevant, and three points should be enough to get the transformation matrix!

    I reverse my verdict! I believe this should work.

    Originally I wrote:

    I don't like being correct in the shift case, as your second method seems risky too!

    You select only a few of all the features PC-DMIS used for its internal bf alignment. I think you need to do your bf on all of them to be certain of getting the same alignment.

    Let's say 30 of your holes are perfect, absolutely zero dev, and three of them are off in XPLUS. Now you happen to select those three for your BF ALIGN and get a large offset in XPLUS, while PC-DMIS did its BF with all the holes and got a much smaller offset.

    Or, if 16 holes are off in XPLUS, 16 are off in XMINUS, 1 is off in YPLUS - there are quite a lot of different alignments that you can get when selecting only three of them.

    I believe that on average, with normal production methods, you're likely to get quite close, but the extreme cases can get very extreme...
  • The Datum Shift would have been good for sets of 2 features as the 3DBF does need 3. Much of the tooling we do has loft, scribelines & some pin-up holes. After all is said and done we simply value the tooling ball coordinates after fitting everything else to the available tolerances. That's what started this whole thing several months ago. I wound up using a tracker instead (different software) but the idea of replicating the datum shift stuck. I don't currently have any parts that lend themselves to this method (#22) but I'd rather have it and not need it than need it and not have it. If nothing else it did help lead to a few other discoveries I can actually put to work.
  • Brain overload.
    Guru meditation 0x000090.

    Rebooting...
  • Not completely undocumented, as they are defined in the PCDLRN type library, and have rather descriptive names Slight smile

    Sounds intriguing! Eagerly awaiting the presentation (although I'll have to wait a day - it's already midday here...)!


    Anders, thanks for pointing me to this post. I am struggling with understanding what this post is about and how it relates to my interest in assigning the datum shift values to variables. I think I understand that I can just copy paste GomoFazter's code to get the ShiftX, ShiftY, and ShiftZ values:

    ASSIGN/BF1_X=GETTEXT("SUMMARY_MEAS",1,{FCFLOC1})
    ASSIGN/BF1_Y=GETTEXT("SUMMARY_MEAS",2,{FCFLOC1})
    ASSIGN/BF1_Z=GETTEXT("SUMMARY_MEAS",3,{FCFLOC1})

    But I think I also need the Rotation X, Rotation Y, Rotation Z values also, and I don't see where that code was posted.

    I tried looking "PCDLRN type library" up in the help file and saw where it tells you how to look up the Object's in VB. I gather that if I can get the PCDLRN type library loaded in Excels VBA editor that I could poke around in there and find some more "SUMMARY_MEAS" or some other (hopefully intuitively descriptive) object name that would yield the Rotation XYZ values.
    I did that and added pcdlrn.tlb to the object browser. I found the SUMMARY_MEAS Member in <globals>.

    Note, I don't know what I'm doing here or what objects, properties, methods, and events really are or how to use them.

    I don't see how you know that SUMMARY_MEAS",1, is the X shift etc.
    I spent a lot of time poking around looking for a "1" property and didn't see it... There are thousands of properties ! Astonished
    I'm lost! I agree with what Vbt posted !

    Brain overload.
    Guru meditation 0x000090.
    Rebooting...


    I don't know if I really want to know HOW to find the correct code, I suspect I would need a lot more understanding of VB to get it. I'd really appreceiate it if someone could just tell me the correct code... please??
  • Kevo,
    If your XactMeasure dimension has a label of "FCFLOC1" the following should pull the datum shift values for you:

    ASSIGN/V1=GETTEXT("DRF_SHIFTX",1,{FCFLOC1})
                ASSIGN/V2=GETTEXT("DRF_SHIFTY",1,{FCFLOC1})
                ASSIGN/V3=GETTEXT("DRF_SHIFTZ",1,{FCFLOC1})
                ASSIGN/V4=GETTEXT("DRF_ROTATIONX",1,{FCFLOC1})
                ASSIGN/V5=GETTEXT("DRF_ROTATIONY",1,{FCFLOC1})
                ASSIGN/V6=GETTEXT("DRF_ROTATIONZ",1,{FCFLOC1})


    Just substitute your dimension label for "FCFLOC1" and you should be set. The code segment you were looking at dealt with locational coordinates of the FCF features.


    Thanks so much! Not that I want to delve too deeply into this... But I did find DRF_SHIFTY and DRF_ROTATIONX in the manual when I searched for those specific terms. but I don't see anywhere in the manual where it refers to the ,1, parameter. is that just a 1=yes or 0=no sort of switch that a 'professional' vb guy would know about?

    <edit>
    Hey, I just noticed that your first post said to get the shifted XYZ's with this code:
                ASSIGN/BF1_X=GETTEXT("SUMMARY_MEAS",1,{FCFLOC1})
                ASSIGN/BF1_Y=GETTEXT("SUMMARY_MEAS",2,{FCFLOC1})
                ASSIGN/BF1_Z=GETTEXT("SUMMARY_MEAS",3,{FCFLOC1})
    

    In that, I figured the shifted Y was the ,2, parameter
    but in the "DRF_SHIFTY",1, you're using the ,1, parameter for all the axes and of course a different object(?) re "DRF_SHIFTY" vs "SUMMARY_MEAS"

    Are they 2 different ways of getting the same data or is the data different?
    If so, my above question becomes a little different... ie how do you know what parameter number to use to get the X,Y or Z and if there are other possible parameters are they documented somewhere? they aren't next to the Data Type Name in my 2012 core manual.
    (note I'm using 2014, but keep using my 2012 pdf because I've got a lot of annotations in it).

    UPDATE: I tried both
    ASSIGN/BF1_X=GETTEXT("SUMMARY_MEAS",1,{FCF_IT14TOP})
    ASSIGN/V10=GETTEXT("DRF_SHIFTX",1,{FCF_IT14TOP})
    and get different results from them
    note,
    ASSIGN/V2=FCF_IT14TOP.X.MEAS
    which I could construct from the expression builder is the same number as
    ASSIGN/BF1_X=GETTEXT("SUMMARY_MEAS",1,{FCF_IT14TOP})
  • Thanks so much! Not that I want to delve too deeply into this... But I did find DRF_SHIFTY and DRF_ROTATIONX in the manual when I searched for those specific terms. but I don't see anywhere in the manual where it refers to the ,1, parameter. is that just a 1=yes or 0=no sort of switch that a 'professional' vb guy would know about?


    GETTEXT Returns the current text from the specified data field: GETTEXT(<String or Integer>, <Integer>, <Pointer>Wink

    This function has three fields.

    First Field—Data Field Number or Description

    The first field can be either a string description of the data field, indicated by item (A) in the image below or the data field number, indicated in item (C) in the image below.

    Note: Item (B) in the image below is not used in this function, but is sometimes used in automation or in report expressions.

    To obtain these values:

    Place PC-DMIS in Command Mode. Right-click anywhere in the Edit window. A shortcut menu appears.

    From the shortcut menu, select Change Pop-up Display and then Data Type Information.

    Position the mouse over a data field in the Edit window. The type description, type number and the type index for that data item are displayed.

    Note: Since the type description may be different for different languages, use the type number if you're using the part program under a language other than the current one.


    Sample Data Type Information Showing (A) Type Description (B) Type String Identifier, (C) Type Number, and (D) Type Index

    Second Field—Type Index

    The second field is the type index, indicated as (D) in the above image. This field is usually zero unless you have more instances of the same type of field in the same command such as multiple DIRECTORY fields shown in the above image. The correct value for this field can be obtained in the same manner as described for the first field.

    Third Field—Command Pointer

    The third field is a command pointer. It points to the command containing the field from which the text is being obtained. This field can be specified either by using command pointer notation (i.e. {F15}) or by using the GETCOMMAND expression as shown in this example.


    Basically it's the instance number of the data type you want.

    For a FCF the datum shift only has one set of values.

    However if you were trying to grab the diameter of the 6th circle where you had reported a pattern 10 holes in one FCF you'd use this number to access the one you wanted.
  • GETTEXT Returns the current text from the specified data field: GETTEXT(<String or Integer>, <Integer>, <Pointer>Wink

    This function has three fields.

    First Field—Data Field Number or Description

    The first field can be either a string description of the data field, indicated by item (A) in the image below or the data field number, indicated in item (C) in the image below.

    Note: Item (B) in the image below is not used in this function, but is sometimes used in automation or in report expressions.

    To obtain these values:

    Place PC-DMIS in Command Mode. Right-click anywhere in the Edit window. A shortcut menu appears.

    From the shortcut menu, select Change Pop-up Display and then Data Type Information.

    Position the mouse over a data field in the Edit window. The type description, type number and the type index for that data item are displayed.

    Note: Since the type description may be different for different languages, use the type number if you're using the part program under a language other than the current one.


    Sample Data Type Information Showing (A) Type Description (B) Type String Identifier, (C) Type Number, and (D) Type Index

    Second Field—Type Index

    The second field is the type index, indicated as (D) in the above image. This field is usually zero unless you have more instances of the same type of field in the same command such as multiple DIRECTORY fields shown in the above image. The correct value for this field can be obtained in the same manner as described for the first field.

    Third Field—Command Pointer

    The third field is a command pointer. It points to the command containing the field from which the text is being obtained. This field can be specified either by using command pointer notation (i.e. {F15}) or by using the GETCOMMAND expression as shown in this example.


    Basically it's the instance number of the data type you want.

    For a FCF the datum shift only has one set of values.

    However if you were trying to grab the diameter of the 6th circle where you had reported a pattern 10 holes in one FCF you'd use this number to access the one you wanted.


    Thanks for the lesson Ninja! Unfortunately the image you are referring to was not part of your post, so it makes it a little harder to grasp your great tutorial.