hexagon logo

Trying to create a plane off the stand pins to be able to zero out on it.

Hello,

           I am new to CMM programing and have hit a snag. I am trying to create a plane sperate from my CAD drawling so I can raise my part off the granite. How ever I need this plan to allow me to zero it. Like you would do for a manual CMM. When I went to program the plane, I told the vectors that it was <0,0,1> instead of <0,0, -1> . I leveled and origin to the plane in both manual and DCC. Then moved working with the CAD drawling, I was hoping that when I create a plane on the inside of the part that it would recognize that the part was on top of the plane. 

           How ever after I finished doing the manual and DCC alignments for the actual CAD drawling and then went to do the first play though, the CMM errored out each time after trying to take the first four hits for the plane underneath the CAD drawling. 

          So, my question is, is it possible to create a raised plane off the granite and if so,, how do you do this? Any help would be greatly appreciated, thank you for your time. 

Parents
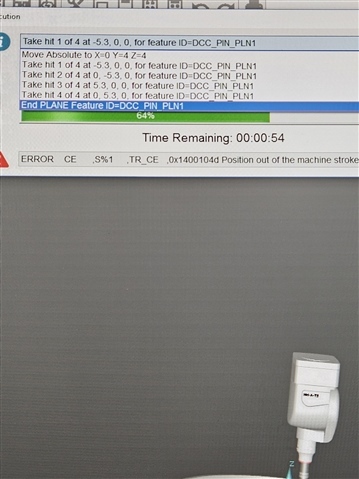
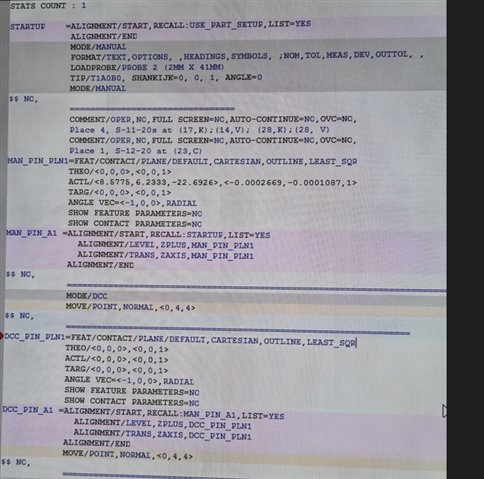
  •    Here is my code. I Have told my vector to be <0,0,1> and both of my planes are the same. But when I run it states my points are our of location. Though it is odd that they are calling out the points as bad when the -5.3 is the distance I put as the spacer for my plane points. 

  • Which axis is out of stroke? 

    You're not telling it where X and Y are located.
    Maybe try picking up a circle on the ID/OD of one of the pins and call that your X/Y origin and try it again. Then redefine your DCC plane and see if that works. 

    Also are you measuring the pins, then setting the part on top of them?

  • I'm probably way off base here but I've had to use standoffs as part of my Z origin at times (like when using the plane as a datum simulator), although typically I'll try to use 2-4-6 blocks if possible so that I can still probe in that area while the part is loaded.  I know that's not always an option.  Anyway, what I've done may be considered crude, but I'll align entirely with the pins at first (plane, 3D line between diameters and the x/y origin at one of the pins), then load the part and do another alignment with the part, still using that plane as the level/z origin.  I used to use calypso and that software has something called "search distance," which is pretty much a separate pre-hit/retract distance from the rest of the program and is often used to locate parts safely when loading the part just by "eyeballing" where it should be.  That said, I've done something similar with PC-DMIS by doing a progressive alignment using a larger pre-hit/retract distance just for the alignment, especially in the case where I'm not entirely sure of the exact location of the standoffs/pins relative to the sides of my part.  Not sure if that offers any insight whatsoever but that's one of many ways to get the job done in a situation like yours.

  • Is the "search distance" parameter from the Calpyso software similar to the "Check" parameter that is in PC-DMIS?

  • Check distance is the amount it will continue to search before it gives up, right?  If so, no, that's a separate setting in calypso.  Search distance is really just a quick way of changing your pre-hit/retract for finding the part and can be made default for alignments or anything else if desired, sort of like having pre-set strategies in PC-DMIS for certain features.  Also, I haven't used calypso since 2022 so things could've changed since then.  

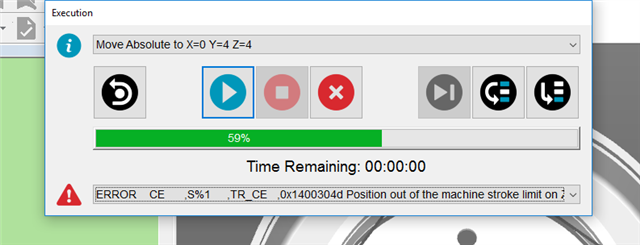
  •    I was able to figure out why the CMM was going to the upper left conner I had forgotten to align my coordinates to match the physical part. Then I created a circle to align my X&Y. But I am still getting the error out of stroke zone. The CMM thinks that my PIN_PLN is at -18.8402 instead of just zero. I do not know why it keeps doing this. Am I missing a step? Thank you for your time. 

  • I see in your Recall parameter of your alignments you are recalling feature names, and not names of alignments? If I am reading this correctly.

    For MAN_PIN_PLN_A1, you are recalling MAN_PIN_PLN1 which is a feature name

    for MAN_PIN_CIR_A2, you are recalling MAN_PIN_CIR1 which is also a feature name

    After those 2 it looks like you are recalling alignment names correctly, but I have no idea what PC-DMIS does when you recall a feature

  • CIR1 Diameter is way off too, that can throw off your center point, which in the case will throw off your X/Y location.
    Also, no need to rotate in the circle alignment, that could also be confusing things up.

    Still can't see which axis the alarm is for, looks like Z though?

  • AM I able to just make a circle that isn't a feature on the CAD? Like I would do if I didn't have a CAD drawling? 

  • You can.

    Maybe we should back up a bit, post a picture of your fixture. Seems like we are getting farther and farther into the weeds. 
    If possible (legal reasons) share a picture of your part sitting on the fixture as well. 

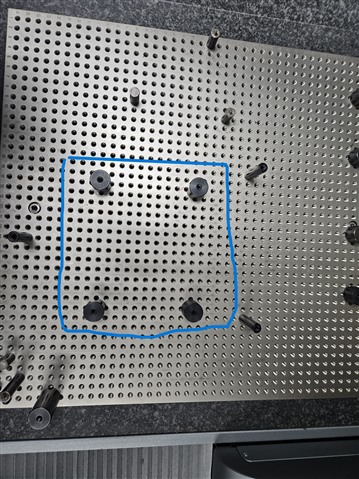
  •  The pins inside the blue square are the ones I am trying to zero out on. The two to the right are what I am pushing it up against the one on the left center is the front centering point (mostly for reference). I can't show a picture of the part sorry. I have a diameter in the middle of my part that needs to be taken but when I try to run it without the stand offs, the prob errors out on the granite. 

    I start in the back left pin and rotate clockwise taking points off each pin. Then I use the upper left one to create the circle on, so I was able to rotate the plane. 

    To eliminate the circle, could I just Level to Z, origin to Z and then Rotate X minus about the Z positive. This way my CAD drawling matches my physical part. I also made it so that my vector read as <0,0,1> to try and make the plane a level zero. 

    If I need the circle, how do I put it in so that the circle is close the same location as the pin, since the pin is on the outer most bottom plane of the part. 

  • If you would like shoot me a message and i can give you my work number. I dont have anything going on and i can walk you through it and answer any questions you have.

    However..... if you have a CAD file. and the cad file touches the posts. The easiest method is to create points on the CAD surface where it touches the post and then flip the vector. When you execute the points... PCDMIS will prompt you to take a point essentially through the part itself. Just hit those points. Then place the part on and find 2 simple features to rotate to and origin to.

    That make any sense?

Reply
  • If you would like shoot me a message and i can give you my work number. I dont have anything going on and i can walk you through it and answer any questions you have.

    However..... if you have a CAD file. and the cad file touches the posts. The easiest method is to create points on the CAD surface where it touches the post and then flip the vector. When you execute the points... PCDMIS will prompt you to take a point essentially through the part itself. Just hit those points. Then place the part on and find 2 simple features to rotate to and origin to.

    That make any sense?

Children
No Data