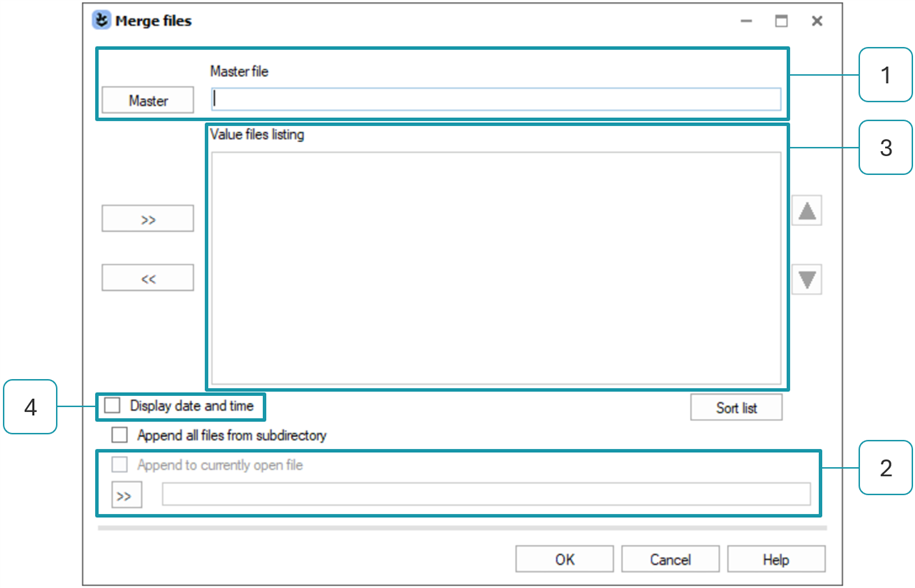
If there are datasets in different files but with the same structure, this dialogue allows the files to be merged so that they can be evaluated together.
It is to ensure that the structure of the master file matches the structure of the files to be included. There is no comparison between the structures of the files. The structure of the master file is used as a template. In other words, the header information at part and characteristic level of the master file is used as a reference. From the files to be included, only the measured values are taken into account.
File merging is basically the merging of measured values from different files according to the structure of the master file.

| 1 | Master (File) The file used as the template. Available formats are DFQ and DFD. The merge will also include the measured values from the selected master file. In the case of a selected DFD file, the merge will only be able to attach the measured values if the corresponding DFX files are also available. |
| 2 | >> (Folder containing the files to be included) Path to the folder containing the files to be included. If a master file is selected, this field is preset to the master file folder. Click ">>" to select a different folder. The field is updated when the selection is confirmed with OK. |
| 3 | Value files listing (List of files in the folder to include) This boxlists the paths of the measurement files when the folder containing the files to be included is configured. These are basically DFQ and DFX format files. The box always lists the files in the main folder, including subfolders and is sorted by path. To update the list, use the "Append all files from subdirectory" option. First disable it, then enable it. |
| 4 | Display date and time The dialogue normally shows the full path of the files. If this option is enabled, the modification date and time of the file is displayed as a prefix. |
Individual file selection and sorting
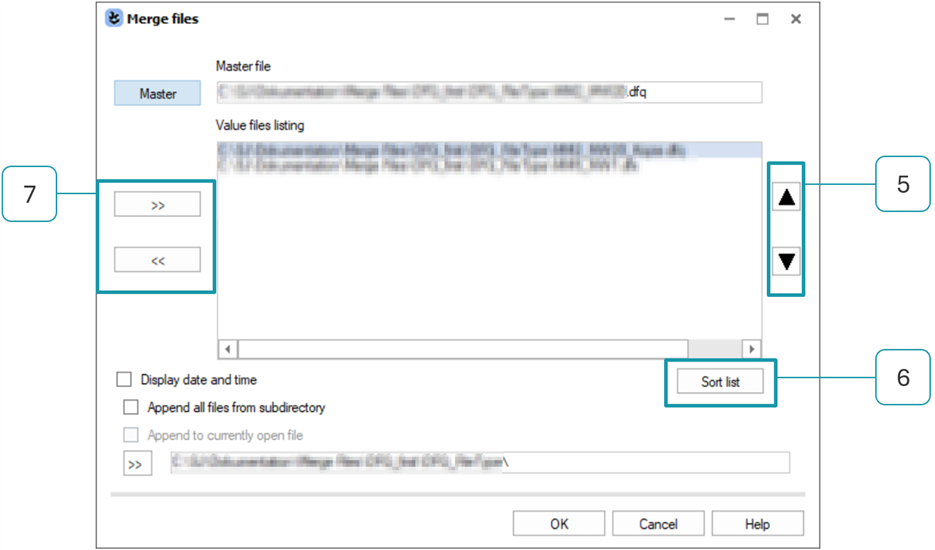
The "Value file listing" box displays a list of all DFQ and DFX files found in the main folder and subfolders. It is sorted by path when it is loaded or updated. It represents the order in which the files will be merged. This order can be customised.

| 5 | Manual sorting Move the order of the selected file up/down using these arrow buttons. |
| 6 | Reset sorting Manual sorting can be reset by pressing the "Sort list" button. If the XX option is disabled, the list is sorted by path. When enabled, the list is sorted by date and time. |
| 7 | Add / remove file These buttons are available when the "Append all files from subdirectory" option is disabled. Use ">>" to add a file. Use "<<" to remove the selected file from the list. |
